
Your bedroom should be a sanctuary that reflects your personal style and offers comfort at the end of a long day. While furniture can be expensive, creating your own DIY headboard is an affordable way to transform your space and make a statement. I’ve always believed that the headboard is the crown jewel of any bedroom — it anchors the bed and sets the tone for the entire room’s aesthetic.
Whether you’re looking for rustic charm, modern elegance, or quirky personality, these 15 DIY headboard ideas will inspire you to create something unique without breaking the bank. The best part? Most of these projects can be completed in a weekend with basic tools and materials. Let’s dive in and discover how you can set your bedroom vibe apart from the rest!
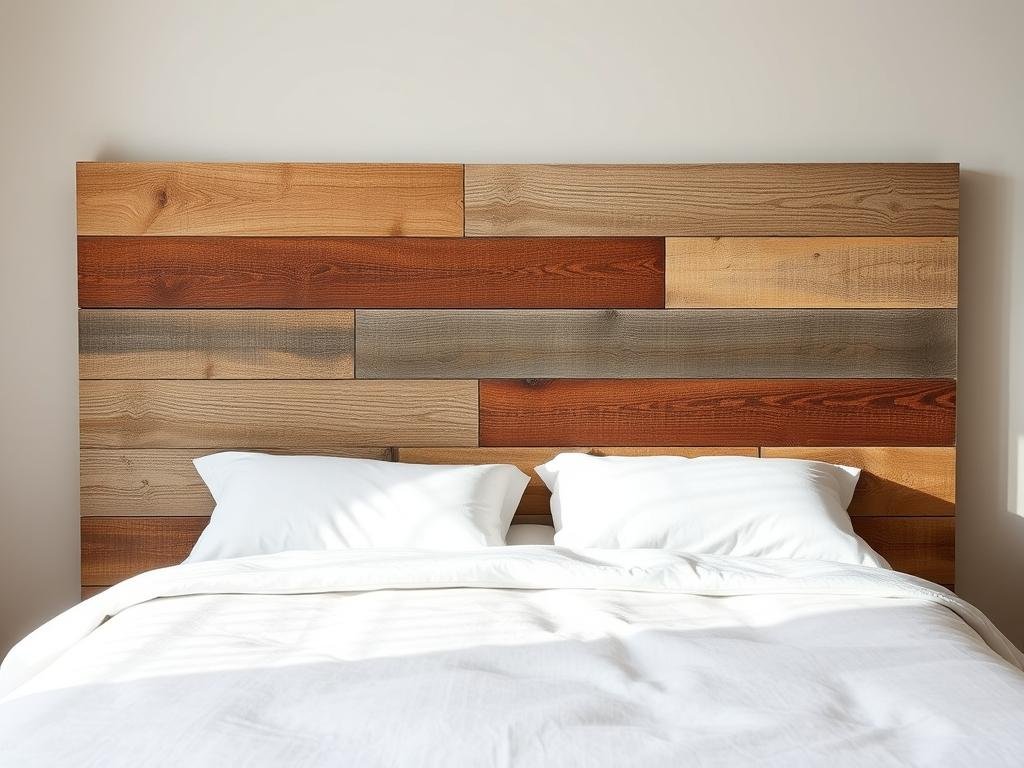
1. Rustic Reclaimed Wood Headboard
Materials Needed:
- Reclaimed wood planks or pallet wood
- Measuring tape and pencil
- Saw (circular or hand)
- Sandpaper (medium and fine grit)
- Wood screws
- Drill with bits
- Wood stain or paint (optional)
- Polyurethane sealer (optional)
Perfect for farmhouse lovers, this headboard uses sanded reclaimed wood for a weathered look that adds instant character to your bedroom. I love how each piece of wood tells its own story through knots, grain patterns, and color variations. Simply cut your planks to size, sand the rough edges (but keep that beautiful patina!), and attach them to a plywood backing or directly to the wall in a pattern you love.
2. Tufted Upholstered Headboard

Materials Needed:
- Plywood or MDF board
- 2-inch thick foam
- Batting
- Upholstery fabric (2-3 yards depending on bed size)
- Covered buttons (12-20 depending on design)
- Upholstery needle and thread
- Staple gun and staples
- Drill with bits
- Wall mounting hardware
This elegant headboard brings luxury to your bedroom without the high-end price tag. The key to a successful tufted headboard is using a pegboard as your base — the pre-drilled holes make button placement incredibly easy! I recommend choosing a durable fabric like velvet or linen that will stand up to daily use while adding beautiful texture to your space.
3. Floating Shelf Headboard with Reading Lights

Materials Needed:
- 1×12 pine or oak board (length of your bed plus 12 inches)
- 2×4 lumber for support
- Wall anchors and screws
- Drill with bits
- Sander
- Wood stain or paint
- Polyurethane sealer
- Clip-on reading lights or wall sconces
- Extension cord or electrical supplies (if hardwiring lights)
This practical headboard doubles as a nightstand, perfect for small spaces or minimalist bedrooms. I built one for my guest room and it’s been a game-changer — no need for bulky nightstands! The integrated reading lights add function while creating a cozy ambiance, and the shelf provides the perfect spot for books, your phone, or a small plant.
4. Repurposed Vintage Door Headboard

Materials Needed:
- Vintage or antique door
- Sandpaper
- Paint or stain (optional)
- Clear sealer
- L-brackets or mounting hardware
- Drill with bits
- Screws
- Safety gear (mask and gloves)
One of my favorite upcycling projects! Old doors can be found at salvage yards for around $25-50, and they make stunning statement headboards with instant character. You can leave the door as-is for a shabby chic look or refinish it to match your decor. For safety, be sure to seal any peeling paint (especially on older doors that might contain lead paint) and secure it properly to the wall or bed frame.
5. Modern Geometric Wood Headboard

Materials Needed:
- Plywood sheet (sized for your bed)
- 1×2 wood strips (approximately 15-20 pieces)
- Wood glue
- Brad nailer or small nails
- Miter saw or miter box
- Measuring tape and pencil
- Wood stain or paint
- Polyurethane sealer
- Mounting hardware
This contemporary headboard makes a bold statement with its angular design. The beauty of this project is that you can create any geometric pattern you like — from simple diamonds to complex herringbone. I recommend drawing your pattern on paper first, then transferring it to the plywood backing before attaching the wood strips with glue and small nails.
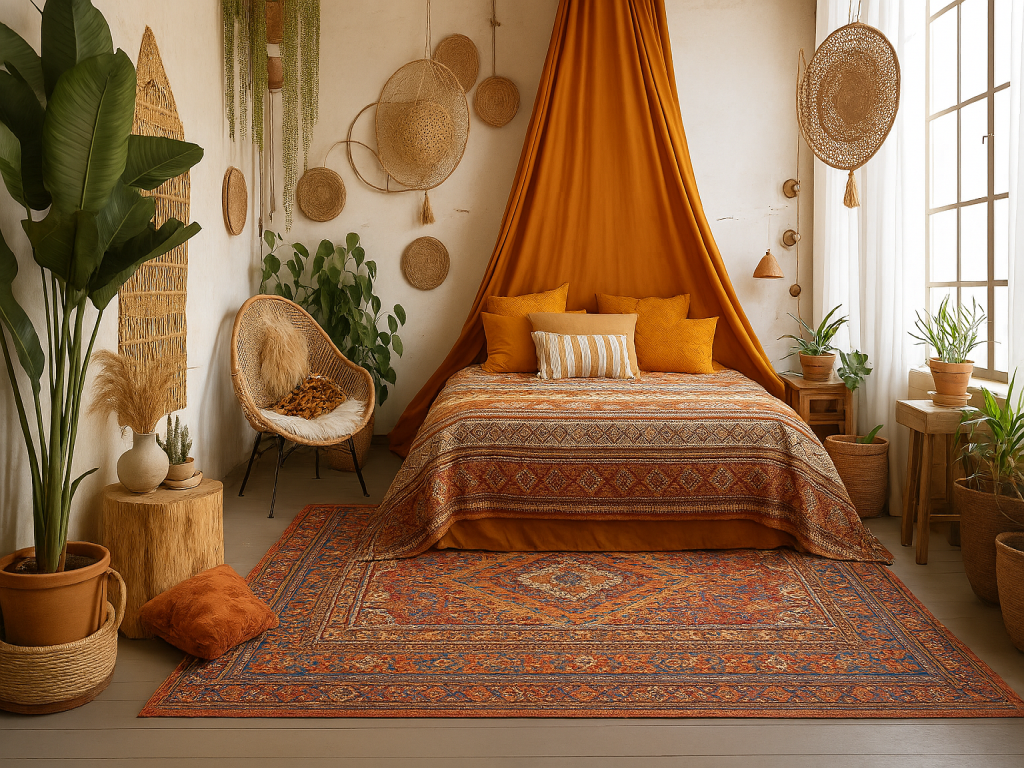
6. Boho Macramé Headboard

Materials Needed:
- Wooden dowel (1-2 inches diameter, wider than your bed)
- Macramé cord (4-5mm thickness, 200-300 yards)
- Scissors
- Measuring tape
- Wall hooks or brackets
- Optional: wooden beads, driftwood pieces, or other decorative elements
For the boho enthusiast, this macramé headboard adds incredible texture and handmade charm to your bedroom. Don’t be intimidated by macramé — even basic knots can create stunning results! I started with just square knots and diagonal clove hitches, and the result was gorgeous. Hang your finished piece from a wooden dowel mounted to the wall above your bed for an airy, bohemian vibe.
7. Pallet Wood Headboard with LED Backlighting

Materials Needed:
- 2-3 wooden pallets (heat-treated, not chemically treated)
- Pry bar and hammer
- Sandpaper (coarse, medium, and fine)
- Saw
- Wood screws
- Drill with bits
- Wood stain or paint
- Polyurethane sealer
- LED strip lights with remote
- Extension cord
This rustic-meets-modern headboard creates amazing ambiance with LED backlighting. The contrast between the rough wood texture and the soft glow is absolutely stunning at night! When working with pallets, be sure to check for a “HT” stamp (heat-treated) rather than “MB” (methyl bromide), as the latter contains harmful chemicals you don’t want in your bedroom.
8. Fabric Panel Headboard

Materials Needed:
- 3 pieces of plywood or MDF (sized according to your design)
- 1-inch foam
- Batting
- Fabric (coordinating colors or patterns)
- Staple gun and staples
- Scissors
- Iron
- Picture hanging hardware
- Level
This customizable headboard lets you play with color and pattern to create a truly personalized look. I love using three panels with coordinating fabrics — it adds dimension without overwhelming the space. The best part is that you can easily swap out the fabric when you’re ready for a change, making this one of the most versatile headboard options on our list.
9. Built-In Bookshelf Headboard

Materials Needed:
- Plywood sheets (¾ inch thickness)
- 1×2 lumber for facing
- Wood screws
- Drill with bits
- Circular saw or table saw
- Measuring tape and level
- Wood glue
- Sandpaper
- Paint or stain
- Polyurethane sealer
For book lovers and small-space dwellers, this functional headboard provides valuable storage while creating a focal point. I designed mine with varying shelf sizes to accommodate both books and decorative items. The key to success is careful measuring and using a level throughout the building process — even small errors can be noticeable when you’re creating built-in furniture.
10. Vintage Window Frame Headboard

Materials Needed:
- 1-4 vintage window frames (depending on size)
- Sandpaper
- Paint or stain (optional)
- Clear sealer
- Heavy-duty picture hanging hardware
- Drill with bits
- Level
- Safety gear (mask and gloves)
Similar to the vintage door concept but with a lighter, airier feel, old window frames make charming headboards with architectural interest. You can arrange multiple windows in a grid pattern or use one large frame as a centerpiece. If the windows still have glass, consider replacing it with mirror panels, decorative fabric, or even family photos for a truly unique creation.
11. Modern Wood Slat Headboard

Materials Needed:
- 1×2 or 1×3 lumber (quantity depends on bed width and desired spacing)
- 1×4 lumber for top and bottom rails
- Wood screws
- Drill with bits
- Miter saw
- Measuring tape and level
- Wood glue
- Sandpaper
- Wood stain or paint
- Polyurethane sealer
- Mounting hardware
This sleek, architectural headboard brings mid-century modern vibes to your bedroom. The vertical slats create beautiful shadow play when light hits them from different angles throughout the day. For the most professional-looking results, take your time with spacing measurements — even small inconsistencies will be noticeable in this geometric design.
12. Woven Leather Strap Headboard

Materials Needed:
- 2×4 lumber for frame
- Leather straps or belts (new or upcycled)
- Upholstery tacks or staple gun
- Hammer
- Drill with bits
- Measuring tape
- Wood stain or paint
- Polyurethane sealer
- Mounting hardware
This sophisticated headboard combines natural textures for a high-end look that would cost hundreds at a furniture store. The woven pattern is surprisingly simple to create — just attach horizontal straps first, then weave the vertical pieces through them. I found genuine leather straps at a thrift store by cutting up old belts, but you can also use new leather strapping from a craft store.
13. Plywood Cutout Headboard

Materials Needed:
- ¾-inch plywood sheet
- Jigsaw
- Sandpaper (medium and fine grit)
- Pencil and template for design
- Drill with bits
- Paint or stain
- Polyurethane sealer
- Mounting hardware
This playful headboard lets you express your creativity through shape and color. I love the modern look of scalloped edges or geometric cutouts, but you could also create mountain silhouettes, floral patterns, or abstract designs. The key is taking your time with the jigsaw cuts and sanding thoroughly for smooth, professional-looking edges.
14. Painted Wall Mural Headboard

Materials Needed:
- Wall paint in your chosen colors
- Painter’s tape
- Pencil
- Level
- Paint brushes and rollers
- Drop cloth
- Stencils (optional)
- Projector (optional, for complex designs)
No carpentry skills? No problem! This headboard alternative uses paint to create the illusion of a headboard directly on your wall. From simple color blocking to elaborate murals, the possibilities are endless. For precise lines, high-quality painter’s tape is essential — I recommend Frog Tape for the crispest edges when creating geometric designs.
15. Hanging Textile Headboard

Materials Needed:
- Large textile piece (vintage rug, tapestry, quilt, or fabric)
- Wooden dowel or curtain rod
- Rod brackets
- Drill with bits
- Wall anchors
- Level
- Measuring tape
- Clips, rings, or fabric sleeve for hanging
Perhaps the easiest DIY headboard on our list, this option allows you to showcase a beautiful textile while adding softness and color to your bedroom. I love using vintage quilts, Moroccan wedding blankets, or even special scarves as unexpected headboard alternatives. The textile can be changed seasonally or whenever you’re ready for a fresh look!
Transform Your Bedroom with Your Perfect DIY Headboard
Creating your own headboard is more than just a money-saving project — it’s an opportunity to express your personal style and add a truly unique element to your bedroom. Whether you’re drawn to the rustic charm of reclaimed wood, the luxurious feel of upholstery, or the artistic expression of a painted mural, there’s a DIY headboard idea here that’s perfect for your skill level and aesthetic.
I hope these 15 ideas have inspired you to pick up your tools and get creative! Remember, the beauty of DIY is that you can customize any of these projects to suit your space, budget, and design preferences. Your bedroom should be a reflection of you — and there’s no better way to make it uniquely yours than with a handcrafted headboard that tells your story.
Share Your DIY Headboard Creation!
Have you made your own DIY headboard? I’d love to see your creation! Share your project photos on Pinterest or Instagram with #DIYHeadboardIdeas to inspire others.

